- A+
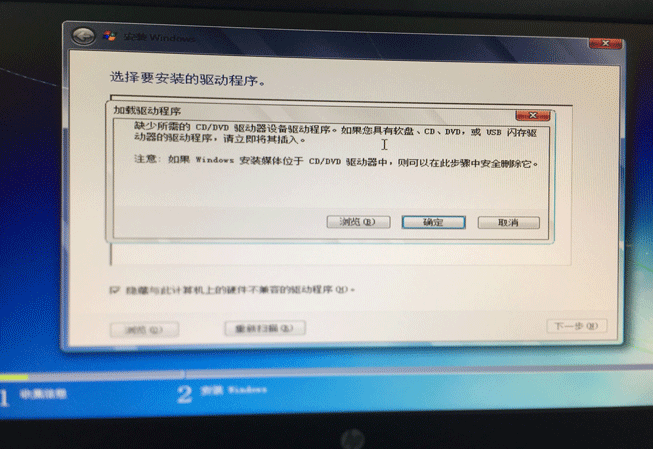
安装系统我们可以用Ghost安装、原版ISO(wim)镜像安装等方式,而我就比较喜欢用原版镜像或者wim文件来安装系统。近日给公司电脑安装系统的时候发现找不到驱动,就是下图这个情况
原来win7的镜像里没有USB3以上的驱动(包括USB3.1) ,而且新的skylake不再支持原有的EHCI主控,变更为最新的XHCI主控。这一变动导致在安装Win7的过程中会出现USB接口全部失灵的状况,不仅无法使用USB键鼠对安装接口进行操作,同时系统也无法读取U盘中的安装档。不过这也不是没有办法解决,我们手动将USB3的驱动整合进wim镜像就可以了。你也可以使用DISM++工具来整合。本文参考了IT天空KDPA119大的文章。
准备工作:原版WIN7企业版ISO镜像、UltraISO软碟通、Winrar等解压工具、USB3驱动。
步骤一.
直接用winrar解压win7原版ISO,我使用的是win7企业版64位,找到 sources文件夹下的“boot.wim”及“install.wim”两个映像档,复制到电脑硬盘上备用。
步骤二.
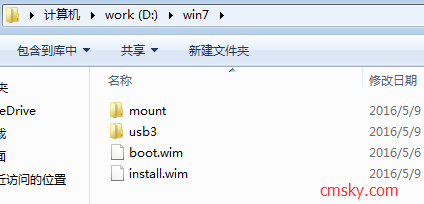
在电脑C盘以外的位置(示范用D盘)新增一个文件夹,名称为 win7,并在这个文件夹里再新增两个子文件夹 mount 及 usb3 。
再把刚刚复制到硬盘的 boot.wim 及 install.wim 两个映像档放到 win7 文件夹里面。
步骤三.
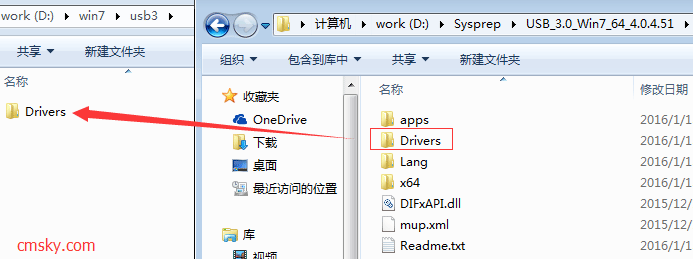
将下载来的USB3.0驱动解压后,找到 Drivers 文件夹,复制到 usb3 子文件夹中。
步骤四.
Drivers 文件夹内有 HCSwitch 与 Win7两个子文件夹,而这两个子文件夹内各自有 x64 x86 两个驱动的文件夹
这里示范的是64位的win7系统,所以可以将 x86 的文件夹给删除。
步骤五.
使用系统管理员身分开启cmd命令窗口。也可以使用Windows PowerShell 来操作。在cmd窗口输入
输入 d: (按Enter)
输入 cd win7 (按Enter)
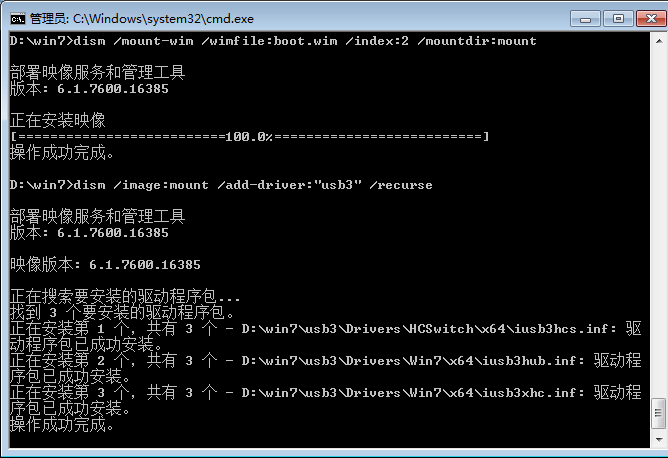
再复制贴上下列指令开始挂载映像,并搜寻usb3文件夹内的XHCI驱动整入到boot.wim映像档中。一条一条执行:
dism /mount-wim /wimfile:boot.wim /index:2 /mountdir:mount
dism /image:mount /add-driver:"usb3" /recurse
dism /unmount-wim /mountdir:mount /commit
执行完上述命令之后usb3驱动就被整合如boot.wim文件了,接下来继续整合install.wim。同样的命令:
dism /mount-wim /wimfile:install.wim /index:1 /mountdir:mount
dism /image:mount /add-driver:"usb3" /recurse
dism /unmount-wim /mountdir:mount /commit
这下usb3驱动也被整合到install.wim里了。
步骤六.
将整入好驱动的 boot.wim 及 install.wim 两个映像档,开启UltraISO软碟通加载原版镜像,替换原版镜像中的 boot.wim 及 install.wim 映像档,另外生成一个新的ISO镜像,或是利用工具来制作成USB系统安装盘。
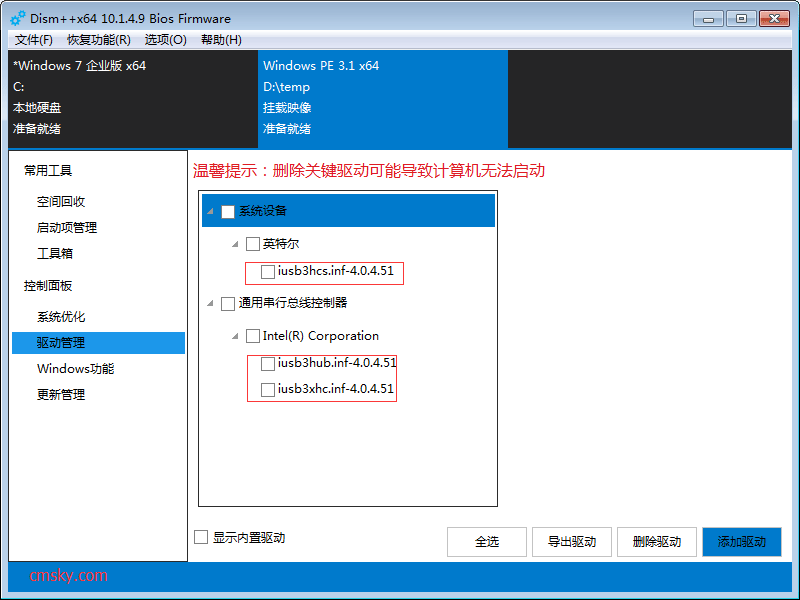
如果你使用dism++来整合也可以,如图所示挂载相应的映象,然后在驱动管理里面添加驱动。
需要注意的是Intel 8/9/100 系列/ C220/C610 芯片组和Intel 7 Series/C216 芯片组驱动是不通用的,我整合了前一个驱动到U盘里然后用来安装HM77芯片组是不行的,装好系统USB3接口也不能用,用IT天空万能驱动助理打驱动也不行,必须用对应的老版USB3驱动即是Intel 7 Series/C216 芯片组驱动。然后我用U盘启动H97的主板发现可以成功以原版安装方式安装了。所以对应什么芯片组就用什么驱动。


2016年5月17日 下午9:57 沙发
Warning: Use of undefined constant auto - assumed 'auto' (this will throw an Error in a future version of PHP) in /www/wwwroot/past.cmsky.org/wp-content/themes/begin5.2/inc/inc.php on line 911
直接在网上下载到。
2016年5月18日 下午3:00 1层
Warning: Use of undefined constant auto - assumed 'auto' (this will throw an Error in a future version of PHP) in /www/wwwroot/past.cmsky.org/wp-content/themes/begin5.2/inc/inc.php on line 911
@免费资源部落 自己手动整合更有乐趣,哈哈!
2016年5月19日 上午10:04 板凳
Warning: Use of undefined constant auto - assumed 'auto' (this will throw an Error in a future version of PHP) in /www/wwwroot/past.cmsky.org/wp-content/themes/begin5.2/inc/inc.php on line 911
學習了,多謝分享。理論上還可以集成更多有需要的驅動
2016年9月27日 上午9:43 1层
Warning: Use of undefined constant auto - assumed 'auto' (this will throw an Error in a future version of PHP) in /www/wwwroot/past.cmsky.org/wp-content/themes/begin5.2/inc/inc.php on line 911
@Sheen5 是的,自己需要什么驱动都可以集成进去~
2018年2月25日 上午7:59 地板
Warning: Use of undefined constant auto - assumed 'auto' (this will throw an Error in a future version of PHP) in /www/wwwroot/past.cmsky.org/wp-content/themes/begin5.2/inc/inc.php on line 911
问一下,是否可以将Intel 8/9/100 系列/ C220/C610 芯片组和Intel 7 Series/C216 芯片组两个驱动同时集成到系统镜像里呢?
2018年2月25日 上午8:04 4楼
Warning: Use of undefined constant auto - assumed 'auto' (this will throw an Error in a future version of PHP) in /www/wwwroot/past.cmsky.org/wp-content/themes/begin5.2/inc/inc.php on line 911
再问一个问题,在PE下载使用备份还原工具安装系统只安装了install.wim文件,并没有使用boot.wim文件,而usb3驱动需要整合到boot.wim文件和install.wim文件,如果使用PE下使用备份还原工具安装系统是不是就无法安装上usb3驱动了呢?
2018年2月28日 下午10:45 1层
Warning: Use of undefined constant auto - assumed 'auto' (this will throw an Error in a future version of PHP) in /www/wwwroot/past.cmsky.org/wp-content/themes/begin5.2/inc/inc.php on line 911
@毋庸讳言 如果你是在PE下安装install.wim的方式安装系统,那么wim镜像里有USB3驱动就行了。整合到boot.wim是为了原版镜像安装方式。