- A+
Let’s Encrypt已经全面进入公测阶段,任何人都可以申请。Let’s Encrypt计划是由Mozilla、思科、Akamai、IdenTrust、EFF 和密歇根大学研究人员等合作推出的为网站提供免费SSL 证书,加速将Web从HTTP过渡到HTTPS的项目。该项目经过数次跳票,已经于12.3日正式公测。试着申请了一个,发现过程很简单,都不用提交csr等东东了。测试环境为Debian,Python版本2.7.3。需要注意的一点是申请证书之前把域名A记录指向你申请证书的那台vps。以下是代码:
apt-get install git
git clone https://github.com/letsencrypt/letsencrypt
cd letsencrypt
./letsencrypt-auto certonly --server https://acme-v01.api.letsencrypt.org/directory
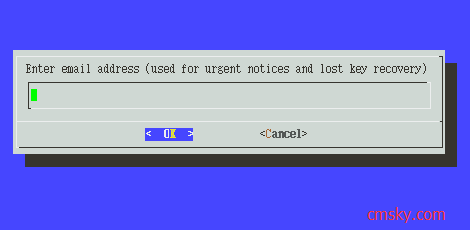
以上命令执行完毕后会出现UI 界面要求你输入email地址
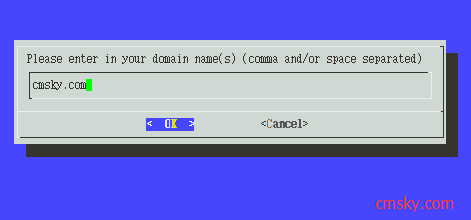
输入email地址后同意许可协议,然后会提示你输入域名例如cmsky.com,多个域名使用逗号或空格分隔。
点击OK后,用不了一会如果成功生成证书会出现“Congratulations! Your certificate and chain have been saved at
/etc/letsencrypt/live/cmsky.com/fullchain.pem.”等提示。
接着去/etc/letsencrypt/live/cmsky.com/文件夹下你会发现4个pem文件,其中fullchain.pem就是配置https站点需要使用的crt文件,privkey.pem就是key文件。接下来就去试试吧。
在 NGINX 的配置文件中将下面两行设置成 Let's Encrypt 的实际路径即可:
ssl_certificate /etc/letsencrypt/live/cmsky.com/fullchain.pem;
ssl_certificate_key /etc/letsencrypt/live/cmsky.com/privkey.pem;
另外需要注意的是目前证书有效期为 90 天,之后需要手动续期。
./letsencrypt-auto certonly --renew-by-default --email admin@past.cmsky.org -d cmsky.com -d www.cmsky.com
2015.12.10补充centos环境,此部分转自loc论坛
首先安装git工具,centos/Redhat是:yum install git-core
获取并安装git包,
git clone https://github.com/letsencrypt/letsencrypt.git
cd letsencrypt
生成SSL证书
./letsencrypt-auto certonly --email 邮箱 -d 域名 -a webroot --webroot-path=/网站目录完整路径
Centos python版本较低的需进行下面的几部
升级python
下载:wget http://www.python.org/ftp/python/2.7.3/Python-2.7.3.tgz
解压:tar -zxvf Python-2.7.3.tgz
进入解压后目录:cd Python-2.7.3
创建安装目录:mkdir /usr/local/python2.7.3
编译安装:./configure --prefix=/usr/local/python2.7.3
执行:make && make install
此时已完成新版本的安装,但由于老版本还在系统中,所以需要将原来/usr/bin/python链接改为新的连接:a.先修改老的连接,执行:mv /usr/bin/python /usr/bin/python_bak。b.再建立新连接: ln -s /usr/local/python2.7.3/bin/python2.7.3 /usr/bin/python
然后输入 : python -V查看版本。不过此时yum不能正常使用,需要修改yum的配置文件,#vi /usr/bin/yum
把文件头部的#!/usr/bin/python改成#!/usr/bin/python2.6 //改为之前的老版本号,保存退出,yum即可正常使用。如若有其他命令、软件不能正常使用,仿照yum配置文件的修改方法,修改其配置文件即可。
升级好之后还需要安装pip工具
cd /root
wget https://raw.github.com/pypa/pip/master/contrib/get-pip.py
python get-pip.py
pip install virtualenv
安装virtualenv
然后生成证书
./letsencrypt-auto --debug certonly --email 邮箱 -d 域名 -a webroot --webroot-path=/网站目录完整路径
生成后的证书在 /etc/letsencrypt/live/ 目录下。
项目首页:https://letsencrypt.org/
Github地址:https://github.com/letsencrypt/letsencrypt


2015年12月4日 下午4:48 沙发
Warning: Use of undefined constant auto - assumed 'auto' (this will throw an Error in a future version of PHP) in /www/wwwroot/past.cmsky.org/wp-content/themes/begin5.2/inc/inc.php on line 911
学习了,有空试下
2015年12月4日 下午5:52 1层
Warning: Use of undefined constant auto - assumed 'auto' (this will throw an Error in a future version of PHP) in /www/wwwroot/past.cmsky.org/wp-content/themes/begin5.2/inc/inc.php on line 911
@Andrew 以后申请证书测试就很更方便了!
2015年12月6日 下午10:54 板凳
Warning: Use of undefined constant auto - assumed 'auto' (this will throw an Error in a future version of PHP) in /www/wwwroot/past.cmsky.org/wp-content/themes/begin5.2/inc/inc.php on line 911
免费的SSL现在越来越多了啊!Http/2的时代即将来临,这些都是必不可少的
2015年12月6日 下午11:47 1层
Warning: Use of undefined constant auto - assumed 'auto' (this will throw an Error in a future version of PHP) in /www/wwwroot/past.cmsky.org/wp-content/themes/begin5.2/inc/inc.php on line 911
@我要免费部落 是啊,这也是好事!
2015年12月26日 下午5:21 地板
Warning: Use of undefined constant auto - assumed 'auto' (this will throw an Error in a future version of PHP) in /www/wwwroot/past.cmsky.org/wp-content/themes/begin5.2/inc/inc.php on line 911
貌似这玩意不哈弄~
2016年4月26日 下午8:18 4楼
Warning: Use of undefined constant auto - assumed 'auto' (this will throw an Error in a future version of PHP) in /www/wwwroot/past.cmsky.org/wp-content/themes/begin5.2/inc/inc.php on line 911
支持,我也更新了这样一篇文章,使用acme-tiny 这个工具自动申请的